Setup Your K8s Cluster with AWS EC2

Hi guys 👋, Since I couldn’t find the proper document to install and setup the K8s cluster on AWS EC2, I thought of writing about the things that I found about K8s and sharing my knowledge with you..😀
There are many ways that you can install the K8s, Such as
Option 1 — Install Kubernetes using Minikube
Option 2 — Install Kubernetes using Kubeadm
Option 3 — Install Kubernetes using Kubernetes Operations (kops)
Option 4 — Managed Kubernetes
- AWS EKS
- Google K8s Engine
- Azure K8s Service
Option 5 — Install Kubernetes Using Terraform
From the above methods, already I have tried Options 1, 2, and 3. And I found that from those three options, the best way to set up our Kubernetes cluster on AWS EC2 is to install using Kubeadm.
Kubeadm is a tool designed to bootstrap a full-scale Kubernetes cluster. It takes care of all heavy lifting related to cluster provisioning and automates the process completely.
Note: In a future post I will compare all the options and will explain the best way to install Kubernetes on a Production grade solution.
Here, I’m going to use Ubuntu 20.04 with kubeadm to setup my K8s cluster on AWS. And below is the requirement of the cluster
In the deployment of Kubernetes clusters, two server types are used:
Master: A Kubernetes Master is where control API calls for pods, replication controllers, services, nodes, and other Kubernetes cluster components (Kube-API Server, Kube-Controller-Manager, Etcd, Kube Scheduler) are executed.
Node: A Node is a system that provides run-time environments for containers. A collection of container pods can span multiple nodes.
In order to create our cluster, we need below minimum requirements:
- Memory: 2 GiB or more of RAM per instance
- CPUs: At least 2 CPUs on the control plane instance
My POC contains one control plane instance, and two nodes to be used for running containerized workloads. Based on your use case once you setup the master node able to add more nodes.

Please note that, since this is a POC according to my requirement I have selected instances as in the above table. Here for the Worker nodes, you can choose the t2 micro instance as well. But keep in mind for the master node you must select the t2 medium instance.
I divided the article into several sections. Let’s get started!
1. Create AWS EC2 instance
We will first create an EC2 instance on which we will build, and configure our cluster (Master Node).
Note: Once you’ve created an instance for the master node, repeat the steps below to create the other two instances for work nodes.
- Login to the AWS console
- Switch to Services -> EC2 -> Launch Instance
- Select the ‘Ubuntu’ image and give the Name which we will use for this article as shown below,

Next,
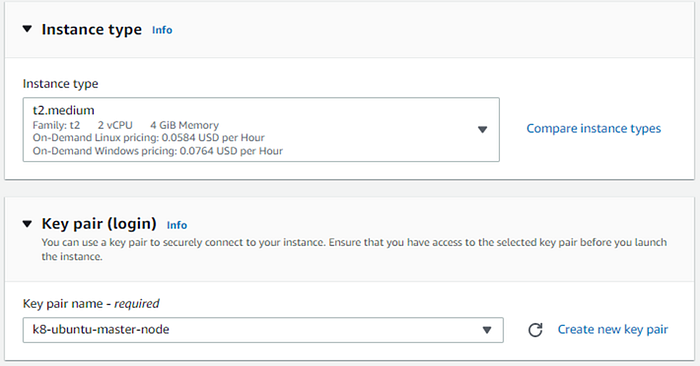
- Select the instance type as shown in the image.
- Create a key-value pair (You can click Create new key pair and it will pop up a new window. Once you created the key-value pair save it in a safe place (If you already have one then you can select from the list).
Next,
Create a new security group as shown below. We need to open a few ports to make the Kubernetes setup work on an EC2 instance.
If we are creating a new security group, by default there are only 3 rules, and we have to add other rules separately.
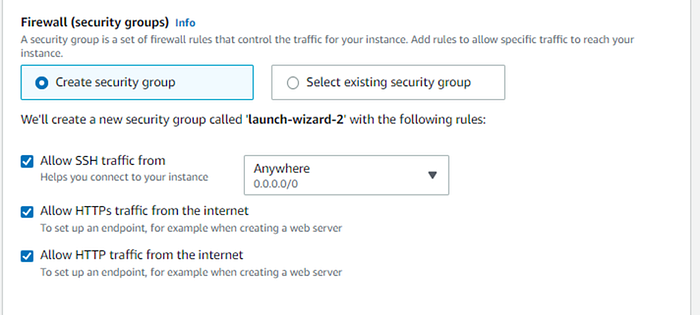
But, for your ease, I will first create a security group with the relevant inbound and outbound rules, and then select the newly created Security group from the list.
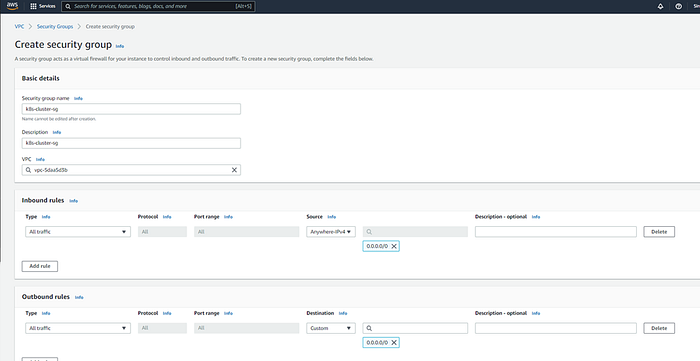
So, please open a new tab in your browser and go to the VPC service by searching through the AWS console.

Select Create Security Group button. And create as shown below.
Note: Because of the ease of future steps, I have added one inbound rule with the Type “All Traffic” and Source “Anywhere -IPv4”. However, AWS does not recommend this (For security reasons), and We must add the rules for which required access from outside to the instance
Once you have created the security group it will show as below
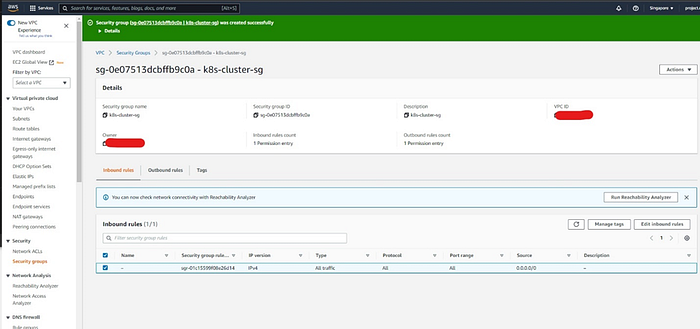
Okay, our security group has been created. Let’s go on to the recently opened instance creation tab.
Click the Select existing security group option and click the refresh icon.
In the list, you can find the security group which we have created and select that one.

Next,
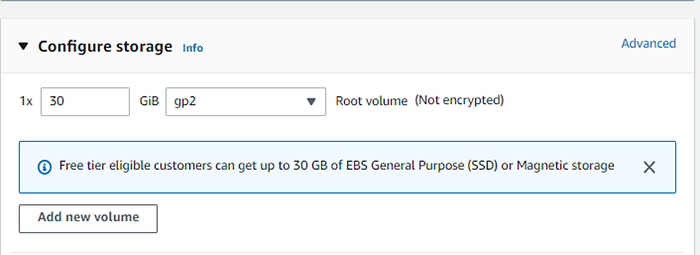
You have to give 30GB as instance storage, since this is the Master node, we have to give considerable memory here.
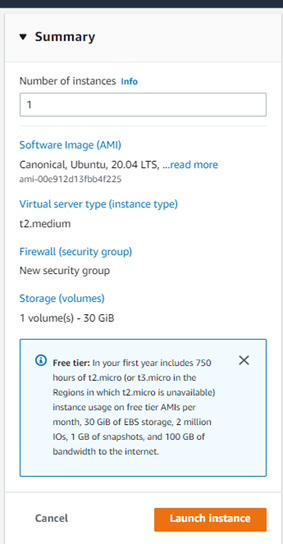
Finally, you can review the instance summary and click the launch instance
Cool… right? 😎
Now you have created an instance for the master node. Now you can create worker nodes following the above same steps.
🎯 Important: Only for the Security group, you can choose the existing security group which we have already created.
Once you have done the creation of the instances, all the instances should be shown as below

Now, we have to connect to the instances in order to perform the next steps.

There are a few ways, you can connect as shown below,
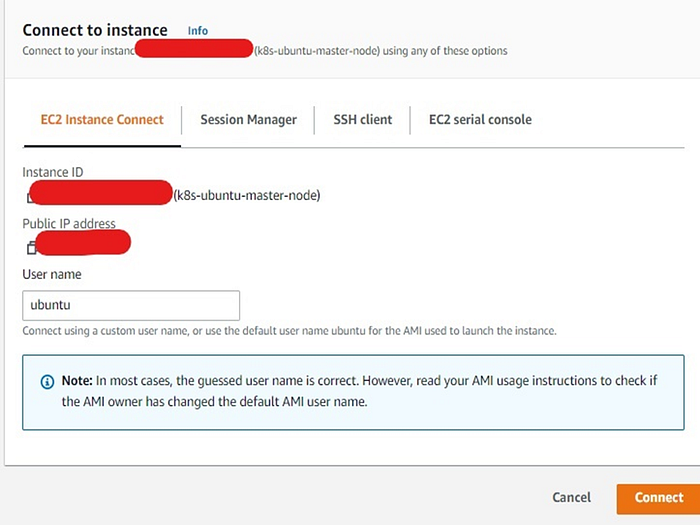
Here, I’m not going to use an SSH client (You can use Putty as a SSH client). I will use the EC2 Instance Connect option. Simply it will open the terminal in your browser.
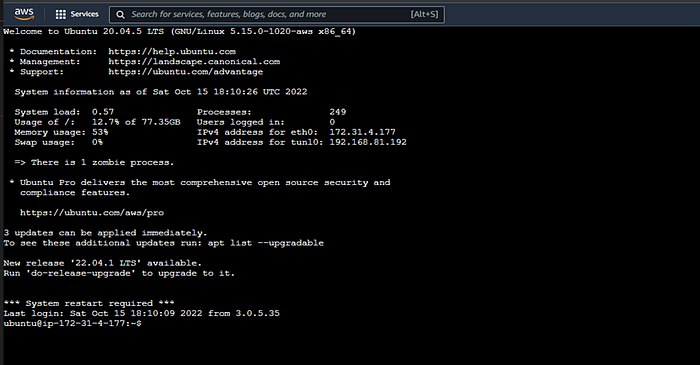
Once you create the instances as in the table and connect to them through Putty or through the browser, we can move on to the next section.
Note: You can connect to the 3 instances in separate tabs through the browser. It will help you to do the installation at the same time.
2. Install Kubernetes Cluster on Ubuntu 20.04
🎯 Important: From Step 1 to Step 4, you must do for all 3 instances.
Step 1: Update & reboot the servers
- Change the current user to the root user
sudo suOutput:

- Update packages and their version
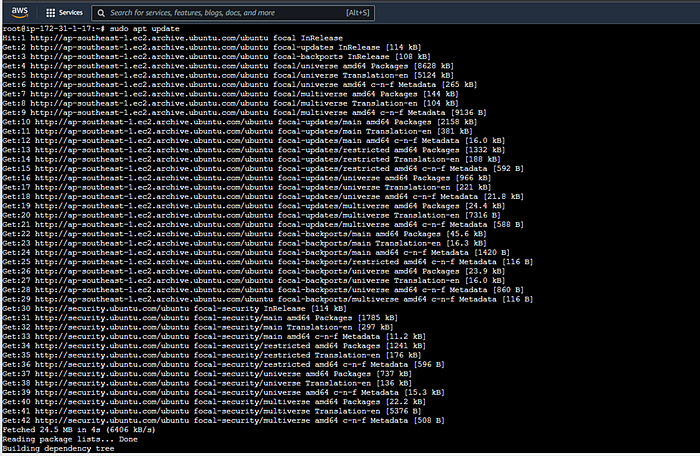
sudo apt updatesudo apt-get update && sudo apt-get upgrade -y
Output:
- Once the update is done reboot the servers
sudo reboot -fNote: If you are connected to the instances through the browser, you have to just wait 1 min or 2 mins and refresh the browser tabs of the three instances, and change the current user using command sudo su
Step 2: Install kubelet, kubeadm and kubectl
- After the servers have been rebooted, add the Kubernetes repository for Ubuntu 20.04 to all of them
sudo apt -y install curl apt-transport-httpscurl -s https://packages.cloud.google.com/apt/doc/apt-key.gpg | sudo apt-key add -echo “deb https://apt.kubernetes.io/ kubernetes-xenial main” > sudo tee /etc/apt/sources.list.d/kubernetes.listORecho "deb https://apt.kubernetes.io/ kubernetes-xenial main" | sudo tee /etc/apt/sources.list.d/kubernetes.list
- Then install the necessary packages
sudo apt updatesudo apt -y install vim git curl wget kubelet kubeadm kubectlsudo apt-mark hold kubelet kubeadm kubectl
- Check the version of kubectl to confirm the installation
kubectl version --client && kubeadm versionOutput:

Step 3: Disable Firewall & Swap
- Disable Firewall
ufw disable- Disable swap
swapoff -asudo sed -i '/swap/d' /etc/fstab
- Confirm setting is correct
sudo mount -afree -h
Step 4: Install Container Runtime
To run containers in Pods, Kubernetes uses a container runtime. Supported container runtimes are:
- Docker
- CRI-O
- Containerd
NOTE: You have to choose one runtime at a time. In my POC I have chosen the Containerd as a runtime
- Configure persistent loading of modules
sudo tee /etc/modules-load.d/containerd.conf <<EOFoverlaybr_netfilterEOF
- Load at runtime
sudo modprobe overlaysudo modprobe br_netfilter
- Ensure sysctl params are set
sudo tee /etc/sysctl.d/kubernetes.conf<<EOFnet.bridge.bridge-nf-call-ip6tables = 1net.bridge.bridge-nf-call-iptables = 1net.ipv4.ip_forward = 1EOF
- Reload configs
sudo sysctl --system- Install required packages
sudo apt install -y curl gnupg2 software-properties-common apt-transport-https ca-certificates- Add Docker repo
curl -fsSL https://download.docker.com/linux/ubuntu/gpg | sudo apt-key add -sudo add-apt-repository "deb [arch=amd64] https://download.docker.com/linux/ubuntu $(lsb_release -cs) stable"
- Install containerd
sudo apt updatesudo apt install -y containerd.io
- Configure containerd and start service
mkdir -p /etc/containerdcontainerd config default > /etc/containerd/config.toml
- Restart containerd
sudo systemctl restart containerdsudo systemctl enable containerdsystemctl status containerd
Step 5: Initialize the Master Node
- Enable kubelet service
sudo systemctl enable kubeletWe now want to initialize the machine that will run the control plane components which includes etcd (the cluster database) and the API Server.
- Pull container images
sudo kubeadm config images pull --cri-socket unix:///run/containerd/containerd.sock- Initialize Kubernetes Cluster
kubeadm init --apiserver-advertise-address=INSTANCE_PRIVATE_IP --pod-network-cidr=192.168.0.0/16 --ignore-preflight-errors=all- To start using your cluster, you need to run the following as a regular user
mkdir -p $HOME/.kubesudo cp -i /etc/kubernetes/admin.conf $HOME/.kube/configsudo chown $(id -u):$(id -g) $HOME/.kube/config
- Alternatively, if you are the root user, you can run
export KUBECONFIG=/etc/kubernetes/admin.confStep 6: Install Network Plugin on the Master
- Deploy the Calico network
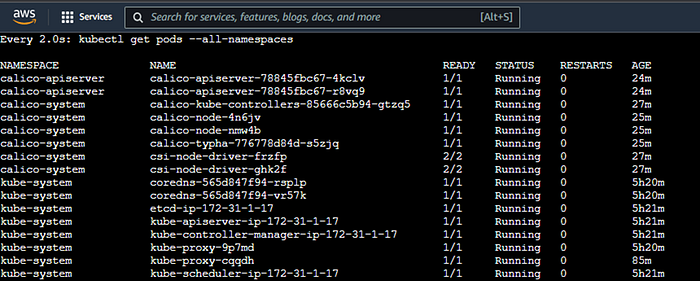
kubectl create -f https://raw.githubusercontent.com/projectcalico/calico/v3.25.0/manifests/tigera-operator.yamlkubectl create -f https://raw.githubusercontent.com/projectcalico/calico/v3.25.0/manifests/custom-resources.yamlwatch kubectl get pods --all-namespaces
Output:
Step 7: Add worker nodes
Once the control plane is complete, you can add worker nodes to the cluster to run scheduled workloads.
Use the output from kubeadm token create command from the master server
- Get cluster to join command
kubeadm token create --print-join-command- Run the output command in your worker nodes
kubeadm join 172.31.1.17:6443 — token exmkm6.v18t1dkyyu0nte89 — discovery-token-ca-cert-hash sha256:1b135f929b6855ecd6ad9358490a3e9bee8d27582c6babac438d4b6f42a3c717Step 8: View the Kubernetes Cluster
- Run the below command on the control-plane (Master Node) to see if the node joined the cluster
kubectl get nodes -o wideOutput:

That means our K8s cluster is ready guys!!!! 😍 💪
3. Install Kubernetes Dashboard with NodePort
Kubernetes dashboard is a web-based user interface that provides information on the state of the Kubernetes cluster resources and any errors that may occur. The dashboard can be used to deploy containerized applications to the cluster, troubleshoot deployed applications, as well as the general management of the cluster resources.
- Kubernetes recommended YAML files were stored in the GitHub repository. To deploy the Kubernetes dashboard, use the kubectl command as shown below.
Kubectl apply -f https://raw.githubusercontent.com/kubernetes/dashboard/v2.7.0/aio/deploy/recommended.yamlWhen we install it, it has version v2.7.0 (The Latest). When you run the above command, it will generate the necessary Kubernetes resources for the dashboard, as shown in the image below.

- Access Kubernetes Dashboard
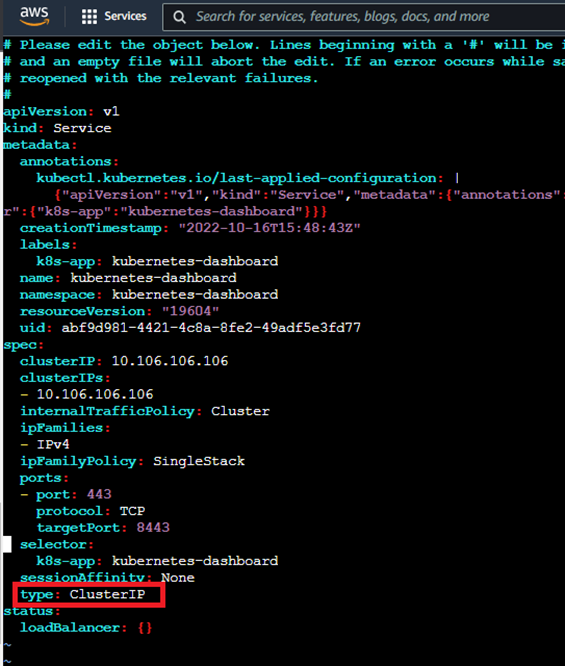
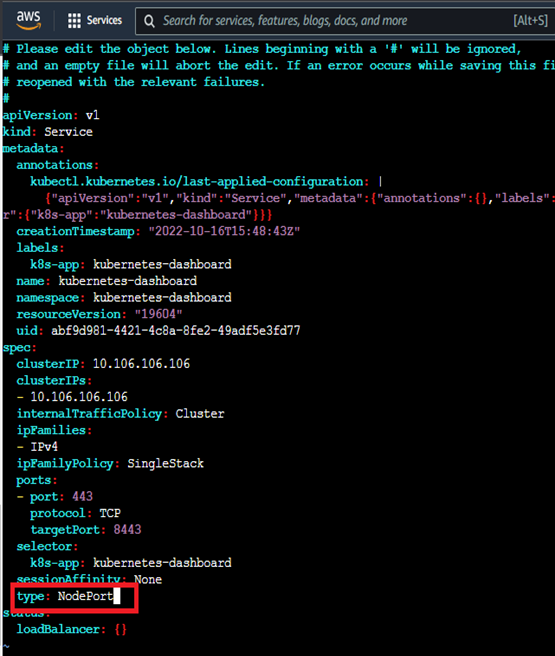
We want to access your Kubernetes dashboard from outside the cluster then we must expose the service using NodePort type. Since the default service type is Cluster IP.
kubectl -n kubernetes-dashboard edit svc kubernetes-dashboardFind the service type and change from ClusterIP to NodePort, save and exit from the file.
Make sure the service type is changed to NodePort.
You can access your dashboard from any browser using the NodePort and the Public IP address you have got.
kubectl -n kubernetes-dashboard get svc
Ex URL: https://Your-Public-IP:NodePort/#/login
👉 If you got a message like below, It is because of Kubernetes UI tries to access the HTTPS URL, and you are using an HTTP URL.

To avoid this, you can use the URL as below,
https://Your-Public-IP:NodePort/#/loginYou will get the login window as shown in below…🥳
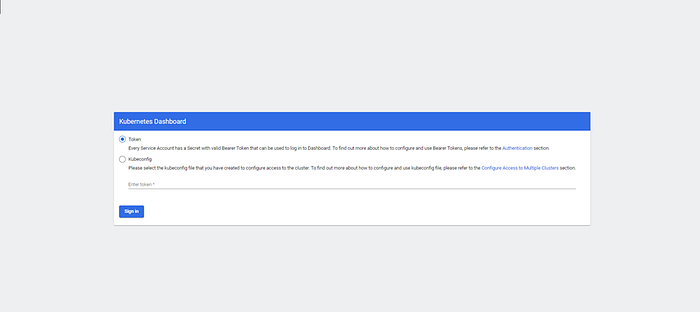
- Get Login Credentials to access Kubernetes Dashboard
There are two ways you can login into the dashboard.
1. Kubeconfig
2. Token
I will use the token method, which is the recommended login method. For that, we need to create a cluster admin service account.
kubectl create serviceaccount admin-user -n kubernetes-dashboardAbove command creates a service account in the kubernetes-dashboard namespace
kubectl create clusterrolebinding admin-user -n kubernetes-dashboard --clusterrole=cluster-admin --serviceaccount=kubernetes-dashboard:admin-userIt Adds the cluster binding rules to your dashboard account that was created in kubernetes-dashboard namespace.
- Generate token
Step 1: Get the output from the below command from the master server
kubectl create token admin-user -n kubernetes-dashboardStep 2: Put it into the field Enter token and click the Sign In button.
You will redirect to the Kubernetes Dashboard as shown below.
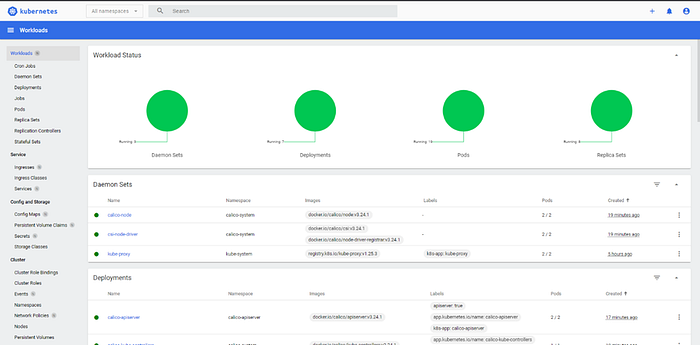
Finally, now we have a K8s cluster running on AWS EC2, with the Kubernetes dashboard! 😍
That’s all for now. As I mentioned earlier since this is POC, I have done a few works with my cluster. So, I will share those with you in future articles very soon.
Happy reading guys!
Bye Bye! ❤️